An even longer time ago I wrote a series of lessons on programming the PIC16F in assembler language using MPLAB 6 (yeah, that long ago). Craig Johnson, AA0ZZ, produced a board to go with the lessons, and that board, and its descendants, continue to live on through a Yahoo group.
I never updated the course for the newer PICs or the newer IDE, but occasionally questions come up on that group which prompted me to make a series of screenshots using MPLAB-X. I considered (for about a millisecond) updating the lesson on MPLAB but got over it.
But here I will provide a little prose for those wanting to get off the ground in MPLAB-X. I should mention that this assumes you want to do 8-bit assembly programming, not because I think that is a good thing in this day and age, but more because I think that is the audience. These days I am much more of a fan of the 16 and 32 bit parts in C. The 8-bit C compilers (and they are legion) are all pretty weak (see my SDCC post), and I am a fan of C. But for the 8-bit parts, I still think assembler is the way to go.
When launching MPLAB-X, the opening screen is kind of busy.
 |
| Start page, first time |
This shows the 'Start Page', a tab (lots of tabs in MPLAB-X) showing some Microchip marketing stuff (actually, some of it quite useful), but most importantly, your recent projects. If you are launching MPLAB-X for the first time, of course there are no recent projects.
 |
| Recent Projects List |
In the screen shot this is the first time MPLAB-X is opened, so there are no previous projects.
Clicking the new project icon (the yellow-ish folder icon on the left) launches the new project wizard.
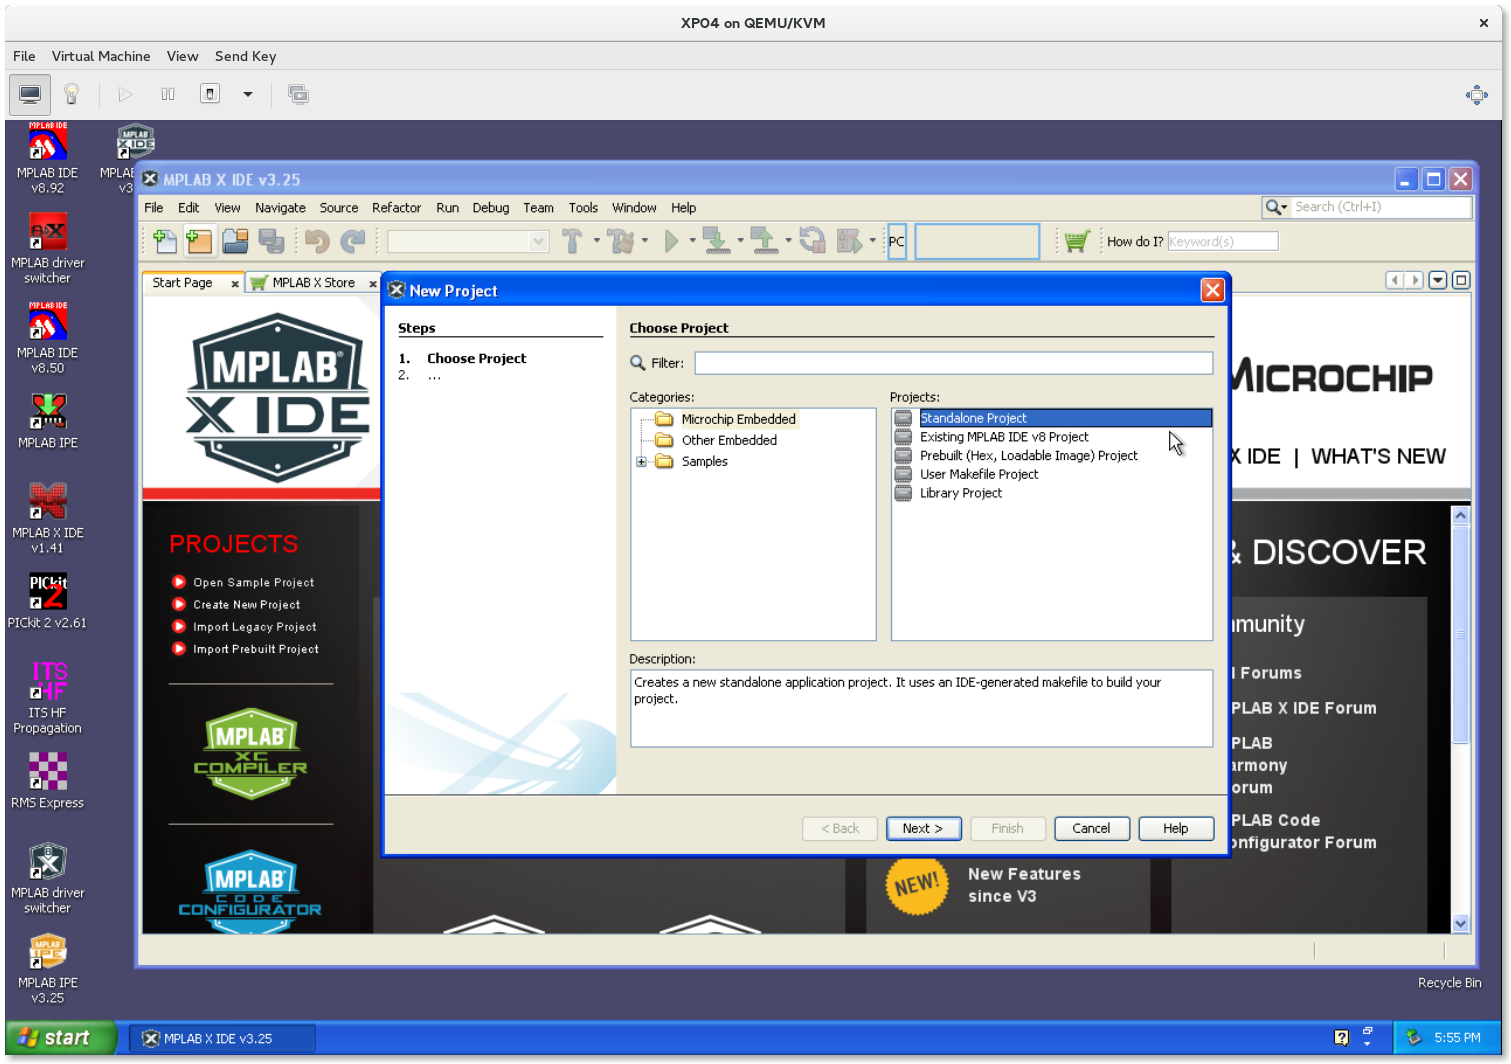 |
| New Project Wizard |
The first panel of the wizard is a little confusing at first. What you want is 'Microchip Embedded' on the left and 'Standalone Project' on the right. The other choices are useful, but not at first.
Clicking Next leads you to a panel to select the processor.
 |
| Processor Selection |
You may choose a family and then a processor from the drop down menus, but there are a lot of PICs in each family. it is easier to simply highlight the Device field and type in the name, or part of the name to narrow the search.
The next panel allows you to specify your programmer.
 |
| Programming Tool Selection |
That is pretty simple business. The next panel lets you select the toolchain.
 |
| Toolchain Selection |
The default installation provides the Hi-Tech compiler and MPASM. To do 16 or 32 bit work you will need to install additional compilers. They will then show up here. When you update compilers, previous versions will continue to be shown until you uninstall the older version.
Finally, you get to name your project.
 |
| Project Name |
The first time, Microchip defaults to an MPLABXProjects folder. This is a perfectly good place, but if you would prefer your projects somewhere else, click Browse and navigate to your favorite place. The directory defaults to the last location you used, so there is no penalty for disagreeing with Microchip.
When you click Finish, your project will be created, however it will have no source files.
 |
| Creating new file |
Right-clicking Source files on the left will bring up a context menu that allows you to specify whether you want to create a new file or add a file you have previously created. Rolling over New will launch a sub-menu allowing you to specify the type of file you wish to create.
 |
| Additional File types |
Should you choose Other, you get a dialog giving you additional choices.
 |
| New File Name |
Clicking Next will allow you to finally give the new file a name. MPLAB-X will provide the extension appropriate to the file.
If you are following the Elmer 160 lessons, the early lessons use absolute code, but MPASM defaults to relocatable code. To specify absolute:
 |
| Project Properties Button |
 |
| mpasmx Options Selection |
Double-clicking the file name in the left pane will open the file in the right pane. You may now edit the file. If the file has not been saved, its name in the tab will be bold. For most files, the source code will be highlighted in color.
 |
| Editing the code |
 | |
| Build Main Project Button |
You will see all sorts of messages fly by in the lower right pane. What is important is that at the end of those messages, you see BUILD SUCCESSFUL in green.
 |
| Build Success |
During the build there may be a lot of messages produced. If you see the green BUILD SUCCESSFUL you can ignore them. But if there was an error, you will get a red BUILD FAILED message. In this case you need to scroll that window up and find the first message that isn't black. Sometimes this can be quite a way up, but when something fails it can often cause other things to fail. It is important to find the first message, because if you try to fix the later messages first, you may end up breaking more things. Be sure to find the first message and fix that. Then review the later messages and see whether they still make sense.
 |
| Build error |
Once you have a successful build, you can program your target project by clicking the Make and Program Device button (with the green downward pointing arrow).
 |
| Make and Program Device Button |
Normally this will go fairly quickly, but depending on what you have done (or not done) previously, it can take a while. The first time you program a particular family, MPLAB has to download code into the programmer. This can be pretty slow. If you haven't changed device families, it will go quite quickly when you program the same device again. Programming some PIC32 devices with a PICkit can also be quite slow. If you are working with these devices you might consider an ICD instead which is significantly faster. Ditto with very large programs.
 |
| Programming Success |
Once again, a number of messages will go flashing by in the lower right pane. When you see Programming/Verify complete your project will be ready to test on the target hardware. And again, if you see red, there is a problem.
| Programming Failure |
I have an old YouTube showing this process. In spite of all the steps it can be quite quick. The video is for a dsPIC on a much older version of MPLAB, but the steps are all the same, even if the screens look a little different.
WARNING: There are lots and lots of tabs in MPLAB-X, and almost every tab can be dragged almost anywhere within the window. If you happen to drag a tab off the window it will become un-docked and separate from the main window. You can re-dock it from a menu on the small window. Should it land on the window border, it will be hidden and marked with a tiny icon on that border. It can be opened from that icon.
Right-click is your friend.
There are a lot of features in MPLAB-X. Later posts will explain some of these features.
No comments:
Post a Comment